I know . . . I know . . . it probably wasn't very kind of me to make you wait for the winner of Ellzabelle's super cute notecard set. But there was a method to my madness. You see, usually there is only one winner of a giveaway . . . and there is one winner of this ready-made set. (Winner mentioned at the end of the post.) But Ellen of Ellzabelle wanted to give you all a little prize . . . a tutorial so that you can make your very own super cute notecards. Let's give Ellen a warm welcome and a big round of applause!
~~~~~~~~~~~~~~~~~~~~~~~~~~~~~~~~~~~~~~~~~~~~~~~~~~~~~~~~~~~~~~~~~~~~~~~~~~
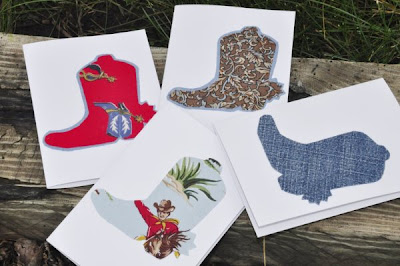
 I'm so excited to be on Elizabeth's blog today to finish up her one year blog celebration! YEAH!!! I'm giving away the eight notecards shown above, but if you didn't win, don't worry, I'm going to show you how to make them!
FABRIC NOTECARD TUTORIAL
 Supplies:
Scissors
Glue (I use Tacky Glue)
Heat n Bond Ultrahold
Blank Notecards/envelopes
Pen/Pencil
Cut out shapes
Fabric scraps
Iron
Ironing Board
Buttons, thread, glitter... OPTIONAL
Let's begin!
1. First iron your fabric scraps to get all wrinkles out. Cut Heat n Bond to size of fabric. Follow directions on package for ironing (2-3 sec with iron on medium dry heat). Iron Heat n Bond onto WRONG side of fabric and allow to cool.
 2. Decide what shapes you want to make. Use the internet for ideas. I like to cut out shapes from cardboard cereal boxes (easier to trace). Some designs I have made are birds, guitars, elephants, whales, guitars, hammers, cowboy boots, LOVE.... The sky's the limit!
3. Trace shape onto paper of Heat n Bond (reverse image) and cut out. Peel paper backing from design.
 Now is the time to accessorize if you want. Handsew buttons for eyes, add ribbon, anything you can think of! Put glue on back of design and press onto notecard. I put into a large book to dry so it will stay flat. When it's dry you can add glue and glitter like I do on my cupcakes.


 It's a nice touch to personalize gifts with matching fabric notecards like I do for my custom knot dresses I sell on etsy.
A nice easy project! Hope you enjoy. Thanks Elizabeth and congrats!
-ellen
~~~~~~~~~~~~~~~~~~~~~~~~~~~~~~~~~~~~~~~~~~~~~~~~~~~~~~~~~~~~~~~~~~~~~~~~~~~
No . . . thank you Ellen! Lovely! Now, here's the winner of this ready made set:
~~~~~~~~~~~~~~~~~~~~~~~~~~~~~~~~~~~~~~~~~~~~~~~~~~~~~~~~~~~~~~~~~~~~~~~~~~
 I'm so excited to be on Elizabeth's blog today to finish up her one year blog celebration! YEAH!!! I'm giving away the eight notecards shown above, but if you didn't win, don't worry, I'm going to show you how to make them!
FABRIC NOTECARD TUTORIAL
 Supplies:
Scissors
Glue (I use Tacky Glue)
Heat n Bond Ultrahold
Blank Notecards/envelopes
Pen/Pencil
Cut out shapes
Fabric scraps
Iron
Ironing Board
Buttons, thread, glitter... OPTIONAL
Let's begin!
1. First iron your fabric scraps to get all wrinkles out. Cut Heat n Bond to size of fabric. Follow directions on package for ironing (2-3 sec with iron on medium dry heat). Iron Heat n Bond onto WRONG side of fabric and allow to cool.
 2. Decide what shapes you want to make. Use the internet for ideas. I like to cut out shapes from cardboard cereal boxes (easier to trace). Some designs I have made are birds, guitars, elephants, whales, guitars, hammers, cowboy boots, LOVE.... The sky's the limit!
3. Trace shape onto paper of Heat n Bond (reverse image) and cut out. Peel paper backing from design.
 Now is the time to accessorize if you want. Handsew buttons for eyes, add ribbon, anything you can think of! Put glue on back of design and press onto notecard. I put into a large book to dry so it will stay flat. When it's dry you can add glue and glitter like I do on my cupcakes.
Some other cards I have made.
 It's a nice touch to personalize gifts with matching fabric notecards like I do for my custom knot dresses I sell on etsy.
-ellen
~~~~~~~~~~~~~~~~~~~~~~~~~~~~~~~~~~~~~~~~~~~~~~~~~~~~~~~~~~~~~~~~~~~~~~~~~~~
No . . . thank you Ellen! Lovely! Now, here's the winner of this ready made set:
Giveaway #5
Giveaway Item: a set of 8 applique fabric notecards and envelopes

Winner:
nellana said...
I follow ellzabelle's blog now.
Craft on!


5 comments:
Thanks so much for teaming up and doing this giveaway and tutorial. It's getting saved for my "future" projects. I'm bummed though that I didn't win but all well. Good luck with the move.
This is so cool! I've always wanted to try making cards like yours. Now, I can. Thanks for the tutorial!
Great tutorial - thanks so much. Love the idea.
Just a silly question - is there a substitute for Heat and Bond? I live in Indonesia and we do not have access to such stuff unless we travel.
Thanks again,
Monica
how CUTE. i love these ideas and am so grateful for the tutorial! thanks!
I also wonder about a Heat & Bond substitute or where did you get it? My local craft store doesn't carry it.
Post a Comment